Advanced
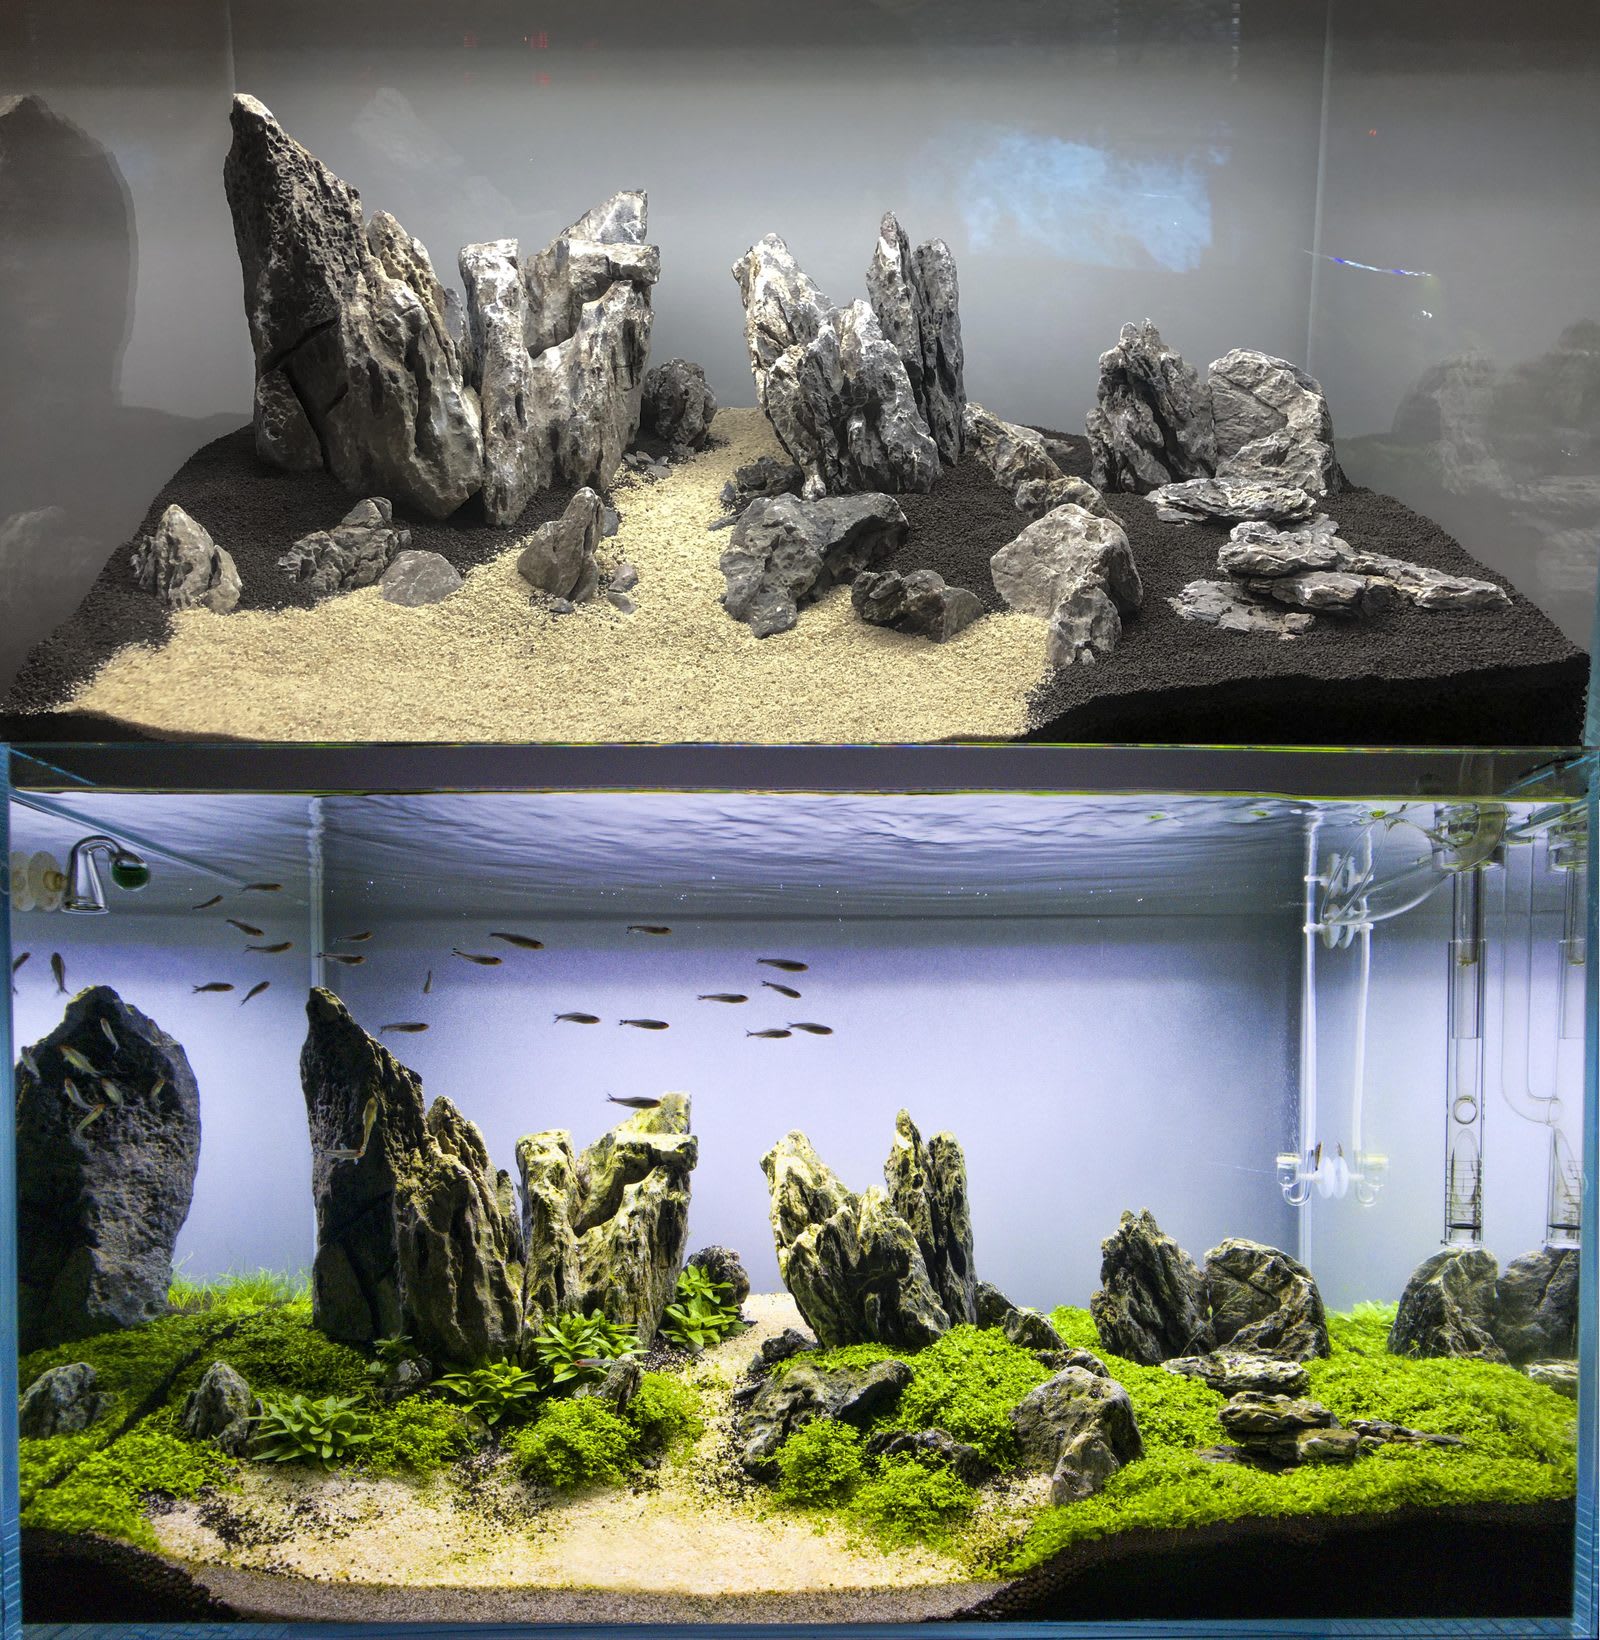
The Iwagumi Master
High light, CO2, and disciplined pruning around a single stone group.
Volume
90 L
Est. monthly cost
~$45
Water target
23–25 °C · pH 6.5–7.2
Overview
A classic Iwagumi layout: strong lighting, pressurized CO2, and carpet plants that reward consistent fertilization and weekly pruning.
Target moderate flow across the carpet to prevent debris pockets behind stones. Use a lily-style outflow and a compact canister or external filter sized for 6–8× turnover.
Dosing follows lean-to-moderate EI or ADA-style daily micros after observing plant response. Expect heavy pearling in peak weeks—drop light if algae outpaces plants.
Fish are optional; small schooling species that tolerate cool, oxygen-rich water work best. Keep bioload low to preserve clarity and CO2 stability.
Step-by-step setup guide
Tank placement & substrate system
Day 1Position the 90 L tank on a sturdy, level cabinet. Layer the substrate in three stages: first a thin dusting of bacterial starter powder (e.g. Bacter 100 or Tourmaline BC), then power sand or pumice for drainage, and finally 4–6 cm of nutrient-rich aquasoil. Build a slope from 3 cm at front to 8–10 cm at back—this creates depth essential to Iwagumi's minimalist aesthetic.
- ▸The steep rear slope is the single most impactful compositional choice—don't skimp on depth.
- ▸Press the soil firmly along the back glass to prevent gradual collapse during water changes.
Stone composition (Iwagumi layout)
Day 1Select 3–5 stones of the same type (Seiryu, Manten, or Ryuoh). Place the main stone (Oyaishi) at the golden-ratio point, roughly 1/3 from one side. Position secondary stones (Fukuishi, Soeishi) at complementary angles, and accent stones (Suteishi) to complete the group. All stones should lean in the same direction, suggesting a natural force like wind or current flow.
- ▸Odd numbers of stones create visual tension—3 or 5 stones is classical Iwagumi.
- ▸Bury stones 1–2 cm into the soil so they appear rooted, not placed on top.
- ▸Step back frequently and view from the intended front—composition reads differently at viewing distance.
Carpet planting
Day 2Choose one primary carpet species: HC Cuba (Hemianthus callitrichoides) for dense, tiny-leaf coverage, Glossostigma for a bright-green look, or Dwarf Hairgrass (Eleocharis acicularis) for a meadow effect. Divide tissue-culture cups into 1 cm² portions and plant in a grid pattern using straight tweezers, spacing 2 cm apart. Add a few Rotala stems in the rear corners for vertical contrast.
- ▸Dry-start method (DSM): plant into moist soil, cover with cling film, and mist daily for 4–6 weeks before flooding. This establishes roots without algae competition.
- ▸If flooding immediately, keep light at 50% for the first 2 weeks to give roots time before pushing growth.
Equipment installation
Day 2–3Install a canister filter rated for 6–8× turnover (540–720 L/h for a 90 L tank). Use lily-pipe outflow and inflow for clean aesthetics and gentle, even flow across the carpet. Mount a high-output LED (50–70 PAR at substrate) on a timer for 8 hours. Set up a pressurized CO2 system with an inline diffuser or glass ceramic diffuser, targeting 1–2 bubbles per second.
- ▸Inline CO2 diffusion before the outflow pipe gives the most even distribution.
- ▸A drop checker with 4 dKH reference solution should show lime-green during lights-on.
Flooding & initial cycling
Week 1–3Fill slowly by pouring water onto a plate or plastic bag placed on the substrate to avoid disturbing the soil slope. The first 1–2 weeks will produce cloudy water and ammonia from aquasoil leaching—this is normal. Perform daily 50% water changes for the first week, then every other day for weeks 2–3. Run CO2 and lights from day one to give plants a head start over algae.
- ▸Ammonia from fresh aquasoil can last 2–4 weeks; do not skip water changes even if the tank looks clear.
- ▸Add dechlorinator to fresh water before it enters the tank.
Algae management & first trim
Week 3–5Expect diatoms (brown film) in weeks 2–3 and possibly green dust algae on glass. Introduce 10–15 Amano shrimp as the primary algae crew. Perform the first carpet trim around week 4—cut HC or Glosso down to 1 cm to stimulate lateral runners. Remove trimmings with a fine net. Begin lean fertilization: daily micros at half dose, potassium as needed.
- ▸Trimming before the carpet fully establishes feels counterintuitive but is essential for density.
- ▸Reduce light duration to 6 hours if green algae outpaces plant growth.
Adding fish
Week 5–6Once ammonia and nitrite read zero, introduce a small school: 10–15 Neon or Ember tetras and 3–5 Otocinclus. Iwagumi traditionally uses a single species school for visual harmony. Drip-acclimate for 30–60 minutes. Feed sparingly—bioload must stay low to maintain the pristine clarity this style demands.
- ▸Fewer fish = cleaner water = less algae. Resist the urge to overstock.
- ▸Otocinclus are delicate; only add them to a mature, algae-present tank.
Maturation & ongoing discipline
Month 2–3+By week 8–12 the carpet should be filling in densely. Continue regular trimming every 10–14 days to maintain carpet height at 1–2 cm. Weekly: 35–50% water change, clean glass, verify CO2 bubble rate and drop checker color. Adjust fertilizer dosing based on plant response—pearling indicates good health, pale new growth suggests nutrient deficiency. The Iwagumi style rewards patience and consistency.
- ▸Keep a trimming log: date, height cut to, and plant response. Patterns emerge after 3–4 cycles.
- ▸An overgrown carpet lifts off the substrate—trim before it reaches 3 cm to prevent this.
Maintenance schedule
Twice weekly: trim runners and remove melt. Weekly: 35–50% water change, glass, filter pre-clean, verify CO2 bubble rate and drop checker color.
Suggested catalog links
Each link opens its catalog page. Import adds the fish and plants to My Tank; add the gear you already run there.
Import to My Tank
Applies tank volume, temperature, pH, light, CO₂ flag, and substrate from this blueprint, then adds any fish, plants, and equipment rows that match listed slugs or equipment ids in the live catalog.